We’re sure you’ve heard the news – as of October 30, 2018, Parallel Tracking is now required for all Google Ads accounts. It’s one of Google’s many initiatives in the push to improve landing-page load-times, and this will affect everyone using a third-party click tracker.
In order to keep you tracking without skipping a beat, ourr latest update ensures that our ThriveTracker cloud services are compatible with Parallel Tracking.
A Quick Overview of Parallel Tracking
Parallel Tracking was instituted in order to speed up the load times for landing pages by separating tracking parameters from the landing page’s URL. Instead of the long-time standard process of loading a tracking URL (to capture valuable insight data) and then redirecting to the Adwords click tracker before the landing page, Parallel Tracking sends the visitor straight to the final landing page while tracking loads in the background.
Why is this so important? According to Google, an increase in load time of just one second can decrease conversions by 20 percent.
Setting Up Parallel Tracking in ThriveTracker
Enabling Google’s Auto Tagging Feature
In order to utilize the Parallel Tracking option within ThriveTracker, you’ll first need to make some adjustments within the Google Ads platform. In your Google Ads account, you’ll need to enable Google’s Auto-tagging feature, which applies Google’s gclid parameter to both of the tracking and final URLs.
To enable, go to:
All campaigns, then your Account Settings tab, then select the radio box in the Auto Tagging section.

Turning on Google’s Parallel Tracking
While still in your Google Ads account, the next step is to enable Parallel Tracking. While you do have the option to set up a tracking URL across your entire account, this one-size-fits-all option is probably not your best bet; we don’t recommend this for ThriveTracker users. When surveying our clientbase, it’s clear each campaign’s tracking URL is likely to use different parameters for every landing page or direct-linked offer.

Setting Up Your Tracking URL with ThriveTracker and Google Ads
Once Auto-tagging and Parallel Tracking are enabled in Google Ads, you can set up your tracking URL for your campaign or ads group in ThriveTracker. If you are using one landing page within your campaign, then you can set up Parallel Tracking on the Campaign level. All campaigns with multiple landing pages will have to have Parallel Tracking set up on the Ads Group level.
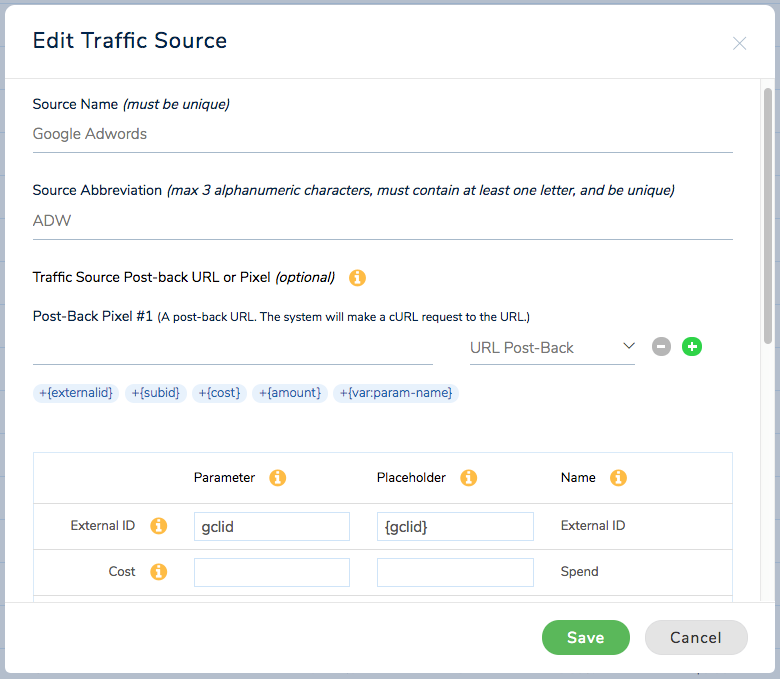
In your ThriveTracker account, navigate to your Traffic Sources tab, then choose Add New Source. In this section, you’ll need to make sure you’ve added Google Ads gclid as an external ID (a field that is left blank when not using Parallel Tracking) in your Google Ads traffic source template.
Next, you’ll want to retrieve the “Parallel Tracking URL” from the campaign(s) you need to set up parallel tracking on. This can be found under your campaign’s general overview page.

Once you’ve copied your Parallel Tracking URL, go back to your Google Ads and add it as a tracking template either under the Campaign or Ad URL option. Google requires that a passing {lpurl} is used, so you will need to add it as url={lpurl} within the Parallel Tracking URL you just copied from your Thrive account.
You’ll also want to make sure you add a landing page ID to your tracking url as lpid={_lpid}, as well as the custom parameter {_lpid} and it’s value. You also have the option to use a direct-linked offer, in replace of, or in conjunction with, a landing page ID by adding oid={_oid} to your Custom Parameters list, along with it’s value.
For users who want to force a click to go to a specific landing page and offer combination, without relying on Thrive’s rotation rules to do so, they can choose to use both lpid and oid in Google Ads.

The ID’s for landing pages and offers can be found within the Campaign Rotation you’re using for each campaign. Just visit the “Offers and Landing Pages” tab in a campaign and click the “Edit” icon next to the landing page or offer, and its ID will be visible in the title of the dialog window.

Testing Your Tracking
Once you’ve set up your Parallel Tracking in both Google Ads and ThriveTracker, you can test your work to ensure all is well. In Google Analytics, under “Test tracking setup”, you’ll click the TEST button to ensure all checks have passed. If all statuses are greenlighted, you’re ready to move on to the last step.
Copy your new landing page pixel code into your landing page and set the parallel tracking value to true, which is signified with – var parallelTracking = true.

It is recommended that you apply your landing page ID to the landing page pixel. To do this, you’ll edit the landingid parameter like the following example:
var cookielessTracking = true;
var parallelTracking = true;
var landingId = ‘16039’;
var forcedOfferId = ”;
var subIdToken = ‘sxid’;
With these steps completed, you’ll be ready to use your campaign with Google’s Parallel Tracking enabled.
When implemented correctly, parallel tracking is a win for both you and all of your campaign’s visitors. For the visitor, it means a sleeker, faster landing page experience. For you, it means a user that’s more likely to convert.
Now that Parallel Tracking is mandatory for all Google Ads users, don’t hesitate to contact our support team for any help you need implementing Parallel Tracking into your campaigns.